ODBC or Open Database Connectivity is a standard application programming interface (API) for accessing database management systems (DBMS) or also known as database management systems. The designer or developer who makes ODBC has a goal to make ODBC free from the use of certain programming languages, certain database management systems, and certain operating systems. Applications written using ODBC can be ported to other platforms, either on the client or server side, with minor changes to the data access code.
ODBC accomplishes DBMS independence by using the ODBC driver as a translation layer between the application and the DBMS. The ODBC driver is a software standard that enables various applications to share data. There are ODBC drivers for Microsoft® SQL Server ™, Microsoft Access, Oracle®, and so on.
How to set ODBC on Windows 10
The ODBC driver allows you to specify information for connecting to a database in SQL Server, including the directory source name (DSN), directory, database driver, and user ID and password. Then, how do you set up or configure ODBC with SQL Server or something else?
Here are some steps to easily set up ODBC in Windows 10. Immediately, please refer to the steps for setting ODBC in Windows 10 below.
1. The first step, please open the ODBC Data Source on your PC or laptop. how do? You can open it via Windows Explorer C:\Windows\sysWOW64\. Or you can also search via search by typing ODBC. As shown in the image below.
2. Then, the ODBC Data Source Administrator window will appear. In this window, please click the DNS System menu tab at the top. As shown in the image below.
3. Then, please click Add. As shown below.
4. Then, a new window will appear, namely Create New Data Source. Please select SQL Server and click Finish. As shown in the image below.
5. Then, please enter a Name and Description for the ODBC Data Source that you want to create. Then, please also choose the name of the SQL server you want to connect to. If so, please click Next. As shown in the image below.
6. Then, a new window will appear, namely Create a New Data Source to SQL Server. In this window, please select the authentication method required to connect to your SQL Server. There are two options, the first option is Windows NT authentication using a network login ID. This option is only available for Windows networks, and logged in users must have a SQL security login added for their Windows login.
The second option of SQL Server authentication uses the login ID and password entered by the user. You can also select Connect to SQL Server to obtain default settings for the additional configuration options by entering the Login ID and Password for SQL Server. When finished selecting, please click Next. As shown in the image below.
7. Then, please check Change the default database to, then select your database name. Then, click Next. As shown in the image below. You don't need to change any other settings in this window.
8. Next, please click Finish. As shown below. In this window, you also don't need to make any changes.
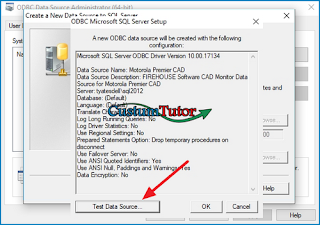
9. Then, if the ODBC Data Source is successfully created, a dialog box will appear as shown below. Then, you can also directly test the Data Source by clicking Test Data Source.
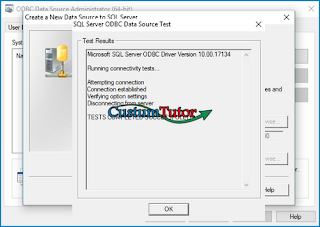
10. Then a dialog box will appear containing Tests Complete Successfully! As shown below. And please click OK.
So many articles this time that discusses how to set up ODBC on Windows 10 very easily. Hopefully this article can be helpful and useful for you. That's all and good luck.


0 komentar
Post a Comment