Wednesday, March 10, 2021

How to Fix d3dx9_43.dll Missing in Windows

How to Fix d3dx9_43.dll Missing in Windows

D3dx9_43.dll missing usually occurs in a variety of software and games that still use directx 9 system. Well if you use windows 10 let alone those based on 64 bit, of course very rarely this problem occurs.

How to Fix d3dx9_43.dll Missing in Windows

But for users of windows 8 down, will still often come into contact with problems d3dx9_43.dll missing. The error notifications that appear on the system include:
  • D3dx9_43.DLL Not Found
  • The file d3dx9_43.dll is missing
  • File d3dx9_43.dll not found
  • D3dx9_43.dll not found. Reinstalling might help fix this
  • System error d3dx9_43.dll is missing
  • d3dx9_43.dll is missing from your computer windows 7

How to Fix d3dx9_43.dll Missing in Windows

To solve this is very easy, you just download the following directx:
For those of you who are Windows 7 users, you must download Platform Update (KB2670838).

How to Fix d3dx9_43.dll Error Manually


This problem is usually caused because your computer doesn't have the latest directx version. Where exactly, you can download it directly from the official microsoft website. Here's how:
  • Make sure you already have the most recent version of windows 7 sp1, windows 8.1 and windows 10 redstone 4
  • Now the file d3dx9_43.dll downloaded from the table above
  • Run the installation as usual
How to Fix d3dx9_43.dll Missing in Windows
  • When you're done, try opening the program or game.

If by doing the above way you have not also succeeded, then the solution is that you have to upgrade the windows version. If windows 7, you have to download the version of windows 7 sp1, if windows 8 should update to 8.1 and and windows 10, then it should update to redstone version 4.

So the tips that I can share this time about How to Fix d3dx9_43.dll Missing in Windows. Hopefully with what I have shared this time, can be useful. That's it.
How to Fix "Msvcp110.dll Missing Error in Windows

How to Fix "Msvcp110.dll Missing Error in Windows

Msvcp110.dll drror usually appears when we are installing a program or game. It can also be when new windows boot or are shutdown, even silly, sometimes msvcp110.dll missing can also appear when we are not using the computer. With this error, we are actually warned by Windows that there is a loss of important system files that are useful for many things.

How to Fix "Msvcp110.dll Missing Error in Windows

Fixing msvcp10.dll missing error is easy. This problem often attacks Windows and arguably enough to make us confused. Usually, there are several msvcp110 notifications.dll different errors that can occur, including:

  • "Msvcp110.dll Not Found"
  • "This application failed to start because msvcp110.dll was not found."
  • "Cannot find [PATH]msvcp110.dll"
  • "The file msvcp110.dll is missing"
  • "Cannot start [APPLICATION]. A required component is missing: msvcp110.dll."

For that before we learn how to fix msvcp110.dll error in Windows, we first study what causes it. After knowing the cause then we can learn how to fix msvcp110.dll missing!

Causes of Msvcp110 DLL Missing Error in Windows


Msvcp110.dll errors are often caused by situations that allow the file to be corrupted or forcibly deleted. In addition, in some cases it can also occur due to virus attacks, hardware malfunctions and program errors. But in general, usually the main cause is the lack of microsoft visual C++ or VCredist features installed.

How to Fix Msvcp110.dll Missing Error in Windows


The recommended way by Microsoft to fix msvcp110.dll missing error is to install visual c++ updates. But you have to make sure first loh yes, the version of the windows system used 64 bit or 32 bit. And then you also check the redistributable version of what year should be installed.
  • Download and install CCleaner for free 
  • Run, then go to the Tools menu > Uninstall
How to Fix "Msvcp110.dll Missing Error in Windows
  • Can be checked the version of Microsoft visual c++ that has been installed on your pc
  • If I see an image, I haven't installed Visual C++ 2015
  • Then I will download visual c++ redistributable 2015 x64
If you already know which type to download, please try you download the Microsoft Visual C++ 2012 Redistributable Package:


How to Solve MSVCP110 DLL Missing Error Manually


In the meantime, there is a second way to fix msvcp110 etc. manually on your computer or laptop. So later you guys have to download the missing dll files. After that you will copy the file to several windows system folders. Include a copy of that dll to the folder where you install the software or game you want to use.
  • Open this fix4dll page to download dll files manually
  • Select your OS, then press the download now button
  • Important : click the text "No Thanks Download Only MSVCP110. DLL DLL File"
  • If the DLL file has been successfully downloaded, copy the msvcp110.dll file
  • Paste to C:WindowsSystem32
  • Then paste also in C:WindowsSysWOW64 (for 64 bit windows users)
  • Next you paste it again, in the Folder where the application or game you want to run.
  • Done, and try running your software or game again!

How To Fix MSVCP110 DLL With Runtimepack

  • Download the latest Runtimepack App for free
  • Extract the files and run setup.exe
  • Install as usual
  • The software will be automatically installed

For those of you who do not know what Runtimepack is, this is a collection of software packages for Windows. It includes various versions of VCredist C++, Important DLL Files and DirectX. By installing this software, we will automatically include all the essential needs of Windows. In many cases, Runtimepack can also fix msvcp100.dll problematic issues.

that's a little tips to solve the problem Msvcp110.dll error. Hopefully with the tips above can be useful yes.

Monday, March 8, 2021

How to Fix Windows Modules Installer Worker High CPU 100%

How to Fix Windows Modules Installer Worker High CPU 100%

Windows Modules Installer Worker is one of the features in Windows 10 where it often makes the computer slow. This time I will talk about how to disable and overcome Windows Modules Installer Worker which causes high cpu overload.

How to Fix Windows Modules Installer Worker High CPU 100%

Windows Module Installer Worker itself is a feature that serves to install updates. But during the installation process, the system jerks will slow down and make the CPU 100 percent.

How to Fix Windows Modules Installer Worker High CPU 100%

This issue is common and will continue to recur when Windows Update runs its process. To fix a Windows Modules Installer Worker that takes up to 100% CPU resources is pretty easy. That is, by turning off the module and setting it to manual.

How to Disable Windows Modules Installer Worker


High CPU 100% can be caused by Windows Modules Installer Worker. By the time this process happens, your computer will be slow. All activities can be stopped and very disruptive to work activities. To disable Windows Modules Installer Worker follow these steps:

  • Open the RUN dialog (Windows + R).
  • Service.msc.
  • Look in the right pane, look for the Windows Update service.
  • Right-click properties, Stop the process first.
  • Change startup type from Automatic to Manual.

How to Disable Windows Modules Installer Worker

  • If you have, you continue to look for a process called Windows Modules Installer.
  • Right click > properties, Stop and change startup type to Manual.

How to Disable Windows Modules Installer Worker

  • When you're done, open Task Manager.
  • Locate the Windows Modules Installer Worker process that consumes high CPU.
  • End Task the process.
  • Restart the computer.

Once finished, the Windows Modules Installer Worker will no longer interfere with your CPU performance. Keep in mind, however, that the Windows Update installation process will not be able to run automatically. Although the update file will still be downloaded by the computer, but the update file will not be installed. You should also diligently check Windows Update manually and see if there are any updates that can be installed.

Wednesday, October 28, 2020

How to Fix Windows Firewall cannot be Enabled or Disabled

How to Fix Windows Firewall cannot be Enabled or Disabled

Windows Firewall is a security system that exists on a computer network. Windows Firewall serves as a protector of various threats coming from outside such as computer networks and the internet. With a windows firewall, your computer will be fully protected from potentially harmful computer systems. Windows Firewall will monitor and control all network traffic, whether in or out or in.

How to Fix Windows Firewall cannot be Enabled or Disabled

With this windows firewall it will provide a protection against access that is considered illegal or unauthorized. There is also a defining that windows firewall is a tool that serves to improve system security on computer networks. By enabling windows firewall, then you do not have to worry anymore because every access will be monitored so that you securely connect your computer in the network.

How to Fix Windows Firewall cannot be Enabled or Disabled


If the windows firewall finds any suspicious access, it will automatically alert you. With the warning given by windows firewall, you can anticipate that there is no illegal access that could harm your computer. But there are circumstances where the Windows firewall cannot be enabled or disabled. The following steps to resolve Windows Firewall cannot be enabled or disabled.

1. Open Services via Start Menu.

How to Fix Windows Firewall cannot be Enabled or Disabled

2. The Services window will open as below below. Then locate the service that is named Windows Firewall or Windows Defender Firewall.

How to Fix Windows Firewall cannot be Enabled or Disabled

3. After that you right click the services and select Properties.

How to Fix Windows Firewall cannot be Enabled or Disabled

4. In startup type, you select Automatic. Then you select Apply > OK.

How to Fix Windows Firewall cannot be Enabled or Disabled

5. After that you need to run the Firewall service by clicking Start the service.

How to Fix Windows Firewall cannot be Enabled or Disabled

6. If you check the Firewall settings, the status will be ON.

How to Fix Windows Firewall cannot be Enabled or Disabled

Benefits of Windows Firewall


So what are the benefits of windows firewall? the following are some of the benefits that firewalls have. For more details, check out some of the reviews below.

1.Protect remote access
The benefit of a firewall is that it can protect your computer from illegal remote access. A bad thing can happen when someone manages to control your computer remotely. Maybe you don't realize that your computer is being controlled, like a self-moving mouse, the screen suddenly displays an image by itself, etc. Imagine if it turned out that your computer was controlled for things that could have a devastating impact on you. Therefore, the firewall works by providing protection where you can then turn off desktop access for remotely. That way, irresponsible people can't take over your computer.

2. Block messages
The second benefit of the firewall is that the software is able to block messages from getting into content you don't want. The Internet has bad code that can attack unprotected devices. With a firewall, messages that can be harmful can be immediately blocked.

3. Play safer online games
Do you like Playing Online Games? Online games turn out to be potentially vulnerable to malware by irresponsible people. If you play the game while the firewall is off, then malware can enter and attack the system. Unlike when you activate windows firewall where this software will provide protection every time you play online games. That way, the computer system becomes more secure and you are comfortable playing the online games you want.

Such are the tips I can share this time about How to Fix Windows Firewall cannot be Enabled or Disabled. Hopefully with what I have shared, can be useful yes, so much and thank you.

Tuesday, October 27, 2020

How to Fix Windows Firewall Has Blocked Some Features of This Program

How to Fix Windows Firewall Has Blocked Some Features of This Program

Windows Firewall is a program that is installed automatically which is used as protection or security. When we are connected to the internet, we are potentially exposed to various threats anytime and anywhere that can result in our data being stolen.

Maybe few people know Windows Firewall. They may not even realize that their laptop or computer with the Windows operating system installed knows that it contains a feature called Windows Firewall.

How to Fix Windows Firewall Has Blocked Some Features of This Program

How to fix Windows Firewall has block some features of this program? Here are the steps for overcoming Windows Firewall has block some features of this program.

How to fix Windows Firewall Has Blocked Some Features of This Program


To solve the problem about Windows Firewall Has Blocked Some Features of This Program, there are 4 methods that we can do, for more details, what are the methods, you can immediately refer to the following review.

1. Allow access to Troubled Applications

The first way you can do to solve the problem of windows firewall has blocked some features of this program is to check the Private networks and Public networks option then select Allow Access.

How to fix Windows Firewall Has Blocked Some Features of This Program

2. Allowing Applications in Firewall Settings

First of all you need to enter Control Panel then select System and Security.

How to fix Windows Firewall Has Blocked Some Features of This Program

After that select the option Allow an app through Windows Firewall.

How to fix Windows Firewall Has Blocked Some Features of This Program

To give firewall access to certain applications, please select Change settings.

How to fix Windows Firewall Has Blocked Some Features of This Program

Select the problematic application, which is the notification windows firewall has blocked some features of this program. Then give a checklist on the Private or Public option. Finally select OK.

How to fix Windows Firewall Has Blocked Some Features of This Program

3. Uninstall the application

Still in the Control Panel window. Please select Uninstall a program.

How to fix Windows Firewall Has Blocked Some Features of This Program

After that select which application causes the windows firewall has blocked some features of this program notification to appear frequently. If indeed you don't use the application, it's better if you delete it than the annoying notification keeps appearing. Right click the application then select Uninstall.

How to fix Windows Firewall Has Blocked Some Features of This Program

4. Restore to Defaults Settings.
 
In the Windows Defender Firewall window, please select Restore defaults.

How to fix Windows Firewall Has Blocked Some Features of This Program

After that, select the Restore defaults option again.

How to fix Windows Firewall Has Blocked Some Features of This Program

If you get a notification like this, just select Yes.

How to fix Windows Firewall Has Blocked Some Features of This Program

By using the Windows Firewall, your computer or laptop can avoid viruses that can attack at any time. In other words, the role of this program is not just security but also as an antivirus. Enabling Windows Firewall means you protect your computer from threats from irresponsible people who sometimes insert viruses on the sites or websites that you open.

There are at least 3 types of firewalls on a computer, including:
  • Windows Firewall Home Network
  • Windows Firewall Work Network
  • Windows Firewall Public Network

So, you can decide which type of firewall to choose. Of course in choosing it you have to adjust it to your needs. For example, Windows Firewall types Home and Work are used to give permission on the same network to be able to access the information on each computer, including yours.

Meanwhile for Windows Firewall Public for users and other users who are connected to the network or not currently connected where they cannot access the data that you have. That way, your data is safe when using the Public type Windows Firewall.

Windows Firewall Types


1. Personal Firewall
Has a function to protect your devices connected to the network so that they cannot access your data or files. Using a personal firewall keeps your computer protected from spam, spyware, and viruses. An example is the Windows Firewall on the computer.

2. Network Firewall
Actually, the network firewall function is not much different from the previous type. Network firewall is a windows security that is used to protect your device more thoroughly. Examples are Microsoft Internet Security and Accelecation Server or ISA Server.

3. Hardware firewall
This type of security is more complex than other types of firewalls. Its function is to secure all components while the system is left running as it is on a network that has previously been specially engineered as a server. Usually a hardware firewall is used on a wider network.
 
4. Firwall software
A software firewall is also called a personal Windows Firewall because it is designed with the aim of protecting computers. Usually used on home computers as well as office computers so that it can prevent unwanted access to other computers so that they cannot be connected to our computers.

Those are the tips I can share about How to fix Windows Firewall has block some features of this program. Hopefully what I have shared can be useful and useful. Good luck and thank you for reading.

Saturday, October 17, 2020

How to Clone Windows 10 to HDD or SSD

How to Clone Windows 10 to HDD or SSD

Cloning is a way to duplicate or duplicate data from one hard drive to another. For example, hard drive A already has a complete operating system and programs. While hard drive B is still empty or not filled with the program at all.

How to Clone Windows 10 to HDD or SSD

So, by doing the Cloning process, for example from computer A to computer B, then you will get the contents and appearance of computer B that are exactly the same as computer A. So this cloning process is a very efficient and effective way compared to having to install the operating system and its programs one by one. on computer B which will take a while.

How to Clone Windows 10


There are several ways to clone Windows 10. One of them is by using an additional application. Some of the applications commonly used to clone a hard drive or Windows 10 are Acronis Director, Clone Disk, EaseUS Todo Backup, and so on.

Actually, the way to do cloning is quite easy, even though carefulness is needed. Because the process is sequential and not in the least bit long. But not as long as you install a new operating system. In this article, we will discuss how to clone Windows 10 using the EaseUS Todo Backup application.

The EaseUS Todo Backup application is an application that has a very powerful utility for its users. This application has various benefits such as backing up data, cloning or completely copying the operating system. This application has two versions, namely the free version and the premium version, aka paid. However, the free version actually fulfills your primary needs. Just follow the steps below.

1. Please download and install the EaseUS Todo Backup application first. You can download this application on the official website.

2. Then run the EaseUS Todo Backup application, then you click Start Now. As shown in the image below.

How to Clone Windows 10 to HDD or SSD

3. If you have a license code, please fill in it, but if you don't have it, just click Later.
 
How to Clone Windows 10 to HDD or SSD

4. Please click the triple line icon on your left. Then, please select System Clone. As shown in the image below. But, make sure before you start, either SSD or HDD storage has been installed with a partition that is completely new or completely empty and does not have a partition.

How to Clone Windows 10 to HDD or SSD

5. Then, please click the check mark on the storage section that you want to clone or copy. As shown below.

How to Clone Windows 10 to HDD or SSD

6. Then, you can also choose additional options in the Advanced Options section. Please click Advanced Options, as shown below.

How to Clone Windows 10 to HDD or SSD

7. Here you will be presented with 3 choices for you.
  • Optimize for SSD: You can select this if the destination hard disk is an SSD type.
  • Sector by sector clone: You can select this if the source and destination hard disks are the same size. If it's different then there's no need. Or if the source partition that is cloned does not have bad sectors problems.
  • Create a portable windows USB drive: You can choose this if you want to make windows portable, but unfortunately you can choose this option if you are using the premium version.
Then, please click OK if you have selected it or Cancel if you don't choose.

How to Clone Windows 10 to HDD or SSD

8. Then, please click Proceed to start the cloning process.
  
How to Clone Windows 10 to HDD or SSD
 
10. Wait until the cloning process is complete.

Thus this article that I discuss about how to clone Windows 10 to HDD / SSD. The method is very easy, isn't it. The length of time for the cloning process depends on how big the partition you are cloning is, the bigger it is, the longer it is. That is all and thank you.

Sunday, October 11, 2020

How to Update Computer or Laptop Drivers to Always Up to Date

How to Update Computer or Laptop Drivers to Always Up to Date

Checking and updating your computer or laptop drivers so they are always up to date is an important thing to do. With Up to Date Computer or Laptop Drivers, the performance of the Computer and Laptop itself will be better. Moreover, to support the running of new application programs which of course will run more optimally with drivers that match the updated version of the application itself.

How to Update Computer or Laptop Drivers to Always Up to Date

One of the easiest to use applications that can be used to check and update your computer or laptop device drivers is Driver Booster. Driver Booster is a well-known driver update application and is widely used by computer and laptop users, especially those who have a hobby of playing games.

How to Update Computer or Laptop Drivers to Always Up to Date

To be able to update Computer and Laptop Applications and Drivers using Driver Booster in full, we must use the Premium or Pro version of the Driver Booster Application which is certainly not free. For the use of the Free version of the Driver Booster application, of course, there will be limitations in its use.

How to Update Computer or Laptop Drivers to Always Up to Date

Here you can get the RC Driver Booster Latest Update Full Version Free which has been proven to be Full Premium but free and can work well like the Pro version of the application purchased using a legal license. Please download the full Driver Booster application.

How to Update Computer or Laptop Drivers to Always Up to Date

After you have successfully downloaded it, just install Driver Booster Pro by running the installer. Then after completing the install process, when the lounce Driver Booster Now checklist appears, just ignore it, close the Install window without running Driver Booster directly.

Extract the Crack File, then paste the Crack file into the install directory folder where the Driver Booster application is stored, namely in the File Program to replace the default Driver Booster application with the Crack file so that it becomes the full version later. After that, then run the Driver Booster application and check the status of your computer or laptop Driver Update.

How to Update Computer or Laptop Drivers to Always Up to Date

A list of outdated drivers will appear. Click update now to download and update drivers automatically.

How to Update Computer or Laptop Drivers to Always Up to Date

After the update process is complete, the Update Completed notification will appear and usually a Restart Now command will appear. Restart Windows to apply the full driver update install.

How to Update Computer or Laptop Drivers to Always Up to Date

IObit Driver Booster 8 RC also provides several Windows system repair tools, including as shown in the screenshot below:

How to Update Computer or Laptop Drivers to Always Up to Date

You can also increase the performance of your computer or laptop to play games by activating Game Boost mode. In addition, we can optimize Windows systems and outdated application programs.
  
How to Update Computer or Laptop Drivers to Always Up to Date

To clean a Windows system, you must use the Advanced System Care application. You can install this application via Driver Booster. It is also easy to update lightweight application programs installed on computers and laptops using Driver Booster. We don't need to check one by one the updated version of the installed application and we use it.

This is the tutorial on how to check and update computer or laptop drivers so that they are always up to date using the Driver Booster Pro Full Version application for free.

Saturday, October 10, 2020

How to Fix The Application Was Unable To Start Correctly

How to Fix The Application Was Unable To Start Correctly

Have either of you received the application was unabel to start correctly? From the message you received, we can already tell that this problem is related to the application that you install on your computer or laptop. Problems like this are experienced by those who use the Windows operating system. It is possible that other operating systems may also experience unused applications but with different error message contents.

How to Fix The Application Was Unable To Start Correctly

Regarding the application was unabel to start correctly, actually when you install any application such as games, multimedia, video editing, etc., there are probably two things you will get.
  • The applications you install can be used normally as usual
  • The application that you installed cannot even be used and will generate an error message
  • For the first chance it doesn't matter. You can run the application as it should. However, for error application problems, you must know about why your application cannot be opened.

Although it's possible that the installation process went well, it got an error when it opened and gave the message the application was unabel to start correctly.

Error Code : 0xc0000005, 0xc0000142, 0xc00007b, 0xc0000906 or 0xc0000142

How to fix The Application Was Unable To Start Correctly


Then what should you do to resolve this application was unable to start correctly? Below we will provide the steps for you.

1. Reinstall the .NET Framework

NET framework is a software framework that is needed when users want to run Windows-based games or applications. One way to solve the problem The application was unable to start correctly is to reinstall or upgrade your NET framework to the latest version.

Visit the official Microsoft site via this link to download the latest version of .NET Framework. Please download the one that says recommended, it indicates the .NET Framework is the latest version.

How to Fix The Application Was Unable To Start Correctly

After that, download the Offline installer version, and select Runtime.

How to Fix The Application Was Unable To Start Correctly

After the download is complete, you double click the file. After that click Yes.

Wait for the extract process to complete. And just follow the installation process.

How to Fix The Application Was Unable To Start Correctly

If so, just restart your computer or laptop. Then the application was unable to start correctly will be resolved.
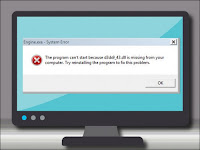
2. Repair DirectX

DirectX allows an application or game to interact with the hardware on the user's computer or laptop. Sometimes DirectX has problems causing the problem The application was unable to start correctly.

Open Windows Explorer and then go to the C: \ Windows folder. After that enter the SysWOW64 folder. If you are a 32-bit Windows user, then log into System32.

How to Fix The Application Was Unable To Start Correctly

After that you need to delete the following DirectX files:

From d3dx9_24.dll to d3dx9_43.dll
d3dx10.dll
From d3dx10_33.dll to d3dx10_43.dll
d3dx11_42.dll and d3dx11_43.dll

How to Fix The Application Was Unable To Start Correctly

If it appears like this, just tick Do this for all current items. Then select Continue.

How to Fix The Application Was Unable To Start Correctly

After that you open this page to download the latest version of DirectX on the official Microsoft website. Just select Download.

How to Fix The Application Was Unable To Start Correctly

If it has been downloaded, just click the file 2X. Then the DirectX installation window will open. Select Next to continue.

How to Fix The Application Was Unable To Start Correctly

Uncheck the Install the Bing Bar option then select Next.

How to Fix The Application Was Unable To Start Correctly

Wait for the installation process to complete. Make sure you stay connected to the internet. Then restart your computer or laptop and run the desired application without fear of the problem appearing again.

How to Fix The Application Was Unable To Start Correctly

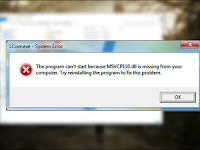
3. Repair Microsoft Visual C ++ Redistributables

Open Control Panel via the Start Menu.

How to Fix The Application Was Unable To Start Correctly

Then you select Uninstall a program.

How to Fix The Application Was Unable To Start Correctly

In the search box located at the top right corner, enter Microsoft Visual C ++. A collection of Microsoft Visual C ++ packages will appear as shown below.

How to Fix The Application Was Unable To Start Correctly

Select a package then select Change.

How to Fix The Application Was Unable To Start Correctly

After that you select Repair then select Yes. Wait for the repair process to complete.
Note: You must repair the entire Microsoft Visual C ++ package one by one.

How to Fix The Application Was Unable To Start Correctly

If you have everything, then you need to restart your computer or laptop. After that try running the application or game you want.

4. Reinstall Microsoft Visual C ++ Redistributables

If the repair is not working and the message The application was unable to start correctly still appears, then you will need to reinstall it in Microsoft Visual C ++ Redistributables.

Click Uninstall on the entire Microsoft Visual C ++ Redistributables package one by one.

How to Fix The Application Was Unable To Start Correctly

After that you download the latest version of Microsoft Visual C ++ Redistributables via this link. After that, install Microsoft Visual C ++ Redistributables as usual. Then restart your computer or laptop.

How to Fix The Application Was Unable To Start Correctly

Recognizing The Application Was Unable To Start Correctly


Regarding the application was unabel to start correctly, this message actually says 0xc0000005, 0xc0000142, 0xc00007b, 0xc0000906 and 0xc0000142. That means, the code indicates a problem with your application. What causes the application to display this message? Here is the answer.

1. Applications that are damaged
The cause of the error 0xc000007b or this application was unable to start correctly is because the application is corrupted. Before installing, it's possible that one or more parts of the application are already problematic.

So, you can't install it on your computer or laptop. It is also possible that you can successfully install the application until the process is complete. But when you want to open it, the message 0xc000007b appears.

2. Applications Installed Wrong Version
The second reason is because you have chosen the wrong version of the application to install. Maybe you actually need a 32-bit type application, but you instead install a 64-bit type application. Even though this problem is actually rare, it doesn't mean your device doesn't have the potential to experience this problem.

3. System Problems
Apart from the two causes above, the cause of this application was unable to start correctly is due to a problem with the system. Maybe the application you installed is not compatible with Windows systems. So you have to install the latest version. It could also be due to other system problems such as related to the .Net Framework.
 
Hopefully the guide on how to resolve this application was unable to start correctly above was helpful and easy to apply. If you have anything to ask, we can discuss it in the comments box.