Tuesday, October 27, 2020

How to Fix Windows Firewall Has Blocked Some Features of This Program

How to Fix Windows Firewall Has Blocked Some Features of This Program

Windows Firewall is a program that is installed automatically which is used as protection or security. When we are connected to the internet, we are potentially exposed to various threats anytime and anywhere that can result in our data being stolen.

Maybe few people know Windows Firewall. They may not even realize that their laptop or computer with the Windows operating system installed knows that it contains a feature called Windows Firewall.

How to Fix Windows Firewall Has Blocked Some Features of This Program

How to fix Windows Firewall has block some features of this program? Here are the steps for overcoming Windows Firewall has block some features of this program.

How to fix Windows Firewall Has Blocked Some Features of This Program


To solve the problem about Windows Firewall Has Blocked Some Features of This Program, there are 4 methods that we can do, for more details, what are the methods, you can immediately refer to the following review.

1. Allow access to Troubled Applications

The first way you can do to solve the problem of windows firewall has blocked some features of this program is to check the Private networks and Public networks option then select Allow Access.

How to fix Windows Firewall Has Blocked Some Features of This Program

2. Allowing Applications in Firewall Settings

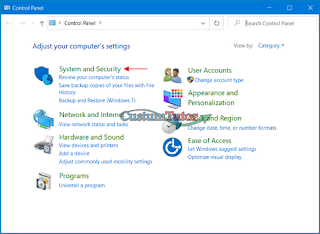
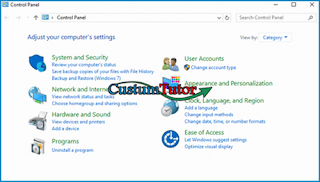
First of all you need to enter Control Panel then select System and Security.

How to fix Windows Firewall Has Blocked Some Features of This Program

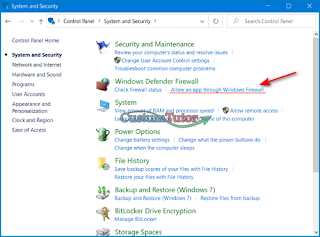
After that select the option Allow an app through Windows Firewall.

How to fix Windows Firewall Has Blocked Some Features of This Program

To give firewall access to certain applications, please select Change settings.

How to fix Windows Firewall Has Blocked Some Features of This Program

Select the problematic application, which is the notification windows firewall has blocked some features of this program. Then give a checklist on the Private or Public option. Finally select OK.

How to fix Windows Firewall Has Blocked Some Features of This Program

3. Uninstall the application

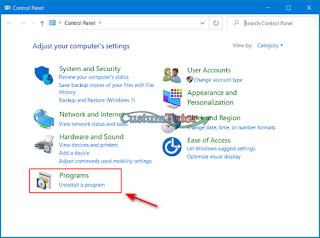
Still in the Control Panel window. Please select Uninstall a program.

How to fix Windows Firewall Has Blocked Some Features of This Program

After that select which application causes the windows firewall has blocked some features of this program notification to appear frequently. If indeed you don't use the application, it's better if you delete it than the annoying notification keeps appearing. Right click the application then select Uninstall.

How to fix Windows Firewall Has Blocked Some Features of This Program

4. Restore to Defaults Settings.
 
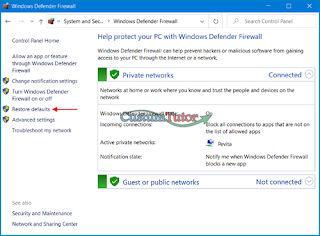
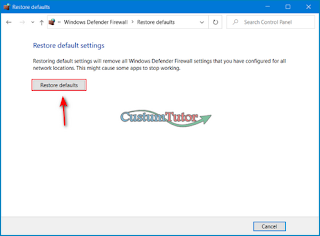
In the Windows Defender Firewall window, please select Restore defaults.

How to fix Windows Firewall Has Blocked Some Features of This Program

After that, select the Restore defaults option again.

How to fix Windows Firewall Has Blocked Some Features of This Program

If you get a notification like this, just select Yes.

How to fix Windows Firewall Has Blocked Some Features of This Program

By using the Windows Firewall, your computer or laptop can avoid viruses that can attack at any time. In other words, the role of this program is not just security but also as an antivirus. Enabling Windows Firewall means you protect your computer from threats from irresponsible people who sometimes insert viruses on the sites or websites that you open.

There are at least 3 types of firewalls on a computer, including:
  • Windows Firewall Home Network
  • Windows Firewall Work Network
  • Windows Firewall Public Network

So, you can decide which type of firewall to choose. Of course in choosing it you have to adjust it to your needs. For example, Windows Firewall types Home and Work are used to give permission on the same network to be able to access the information on each computer, including yours.

Meanwhile for Windows Firewall Public for users and other users who are connected to the network or not currently connected where they cannot access the data that you have. That way, your data is safe when using the Public type Windows Firewall.

Windows Firewall Types


1. Personal Firewall
Has a function to protect your devices connected to the network so that they cannot access your data or files. Using a personal firewall keeps your computer protected from spam, spyware, and viruses. An example is the Windows Firewall on the computer.

2. Network Firewall
Actually, the network firewall function is not much different from the previous type. Network firewall is a windows security that is used to protect your device more thoroughly. Examples are Microsoft Internet Security and Accelecation Server or ISA Server.

3. Hardware firewall
This type of security is more complex than other types of firewalls. Its function is to secure all components while the system is left running as it is on a network that has previously been specially engineered as a server. Usually a hardware firewall is used on a wider network.
 
4. Firwall software
A software firewall is also called a personal Windows Firewall because it is designed with the aim of protecting computers. Usually used on home computers as well as office computers so that it can prevent unwanted access to other computers so that they cannot be connected to our computers.

Those are the tips I can share about How to fix Windows Firewall has block some features of this program. Hopefully what I have shared can be useful and useful. Good luck and thank you for reading.

Saturday, October 24, 2020

How to Export CorelDraw (CDR) Files to JPG and PNG

How to Export CorelDraw (CDR) Files to JPG and PNG

How to Export Corel Draw (CDR) files to JPG and PNG is not as easy as in Photoshop, because in the Save As menu (CTRL + Shift + S) in Corel Draw there is no save as file in jpg or png format.

How to Export CorelDraw (CDR) Files to JPG and PNG

Then how do you change our content or design in the CorelDraw file into a Jpg or Png format image (image file)?

Actually the way to do it is quite easy, you can use a shortcut combination (CTRL + E) or on the "file" menu then "Export" we can export our design into an image, but you should have to preview the design which will be made into jpg or png (ie by unchecking the filter dialog) in the export window. You can also reset such as width and height in the filter dialog that will appear after clicking Export.

For more details on how to export Coreldraw files to jpg or png, you can just refer to the following steps.

How to Export CorelDraw Files to JPG and PNG

1. First, prepare a design in CorelDraw, if you want only 1 object, please select it first, make sure the design is in the A4, F4, and other worksheet examples.

How to Export CorelDraw Files to JPG and PNG

2. finish clicking export a dialog window will appear as below for JPG settings, don't forget to specify the directory too.

How to Export CorelDraw Files to JPG and PNG

To change it, please click the dropdown menu, see the image above, choose a Jpg or Png file format.
Information :
  • 2.a: Is the name of the file to be exported
  • 2.b: Image file format
  • 2.c: Check to export only selected, uncheck to export everything in the CorelDraw worksheet.
  • 2.d: Filters for further settings. (Check it not to display and vice versa).
  • 2.e: Export

3. This is the filter window for JPG dialog in CorelDraw X6

How to Export CorelDraw Files to JPG and PNG

Information :
  • 3.a: Color Mode: Is a color mode (use CMYK to print out)
  • 3.b: Quality is the quality of the image
  • 3.c: Use "Standard" for website uploads, use "Optional" for better.
  • 3.d: Anti-Aliased: Useful for smoother images.
  • 3.e: Progressive: Similar to the interlace options for GIF images
  • 3.f: Optimize: Allows Photo Paint to change and choose the optimal coding method.
  • 3.g: Units: is the unit of measure, pixel, centimeter, mm, etc.
  • 3.h: Width, Height, height and width of the image.
  • 3.I: Resolution: Change to a large value for a higher quality level
  • 3.j: Maintain Aspect Ration: to maintain the image aspect ratio
  • 3.k: Maintain Size: Maintain the original size and height of the CorelDraw worksheet

How to Export CorelDraw Files to JPG and PNG

Information  :
  • 4.a: Transparency Mode: check Useful so that the background with no object will be transparent, (Transparent Background)

5. Press OK to publish it.

Those are the tips I can share about How to Export CorelDraw Files to JPG and PNG. Hopefully what I have shared can be useful for you. Good luck and thanks for reading.
Friday, October 23, 2020

How to Convert Video Files Using Format Factory Applications

How to Convert Video Files Using Format Factory Applications

All files that will be stored either on a PC or smartphone, of course, have their own and different formats. You can move a file to be opened to another device, but you need to know that, not all devices support many file formats. For example, when you have a video file with the .mov format which of course can only be opened on a cellphone, and of course you cannot open it on a PC.

Of course, to be able to open the video file, you must convert the video file by converting the video file to a format that supports PC devices, such as by converting it to the .mp3 format.

How to Convert Video Files Using Format Factory Applications


You need special software that supports file conversion of various formats. One of the software that can be used is Format Factory. This Format Factory has the advantage that it can support the conversion of all types of files with a very easy way of use. For more details, you can just refer to the following review.

How to Convert Video Files Using Format Factory Applications


To convert a file using the Format Factory application, you can just follow some of the steps below.

1. Run the Format Factory application that you installed earlier. Then, select the file format to be replaced. Here we will try to replace the video file with the .mp4 file format to .mov

How to Convert Video Files Using Format Factory Applications
 
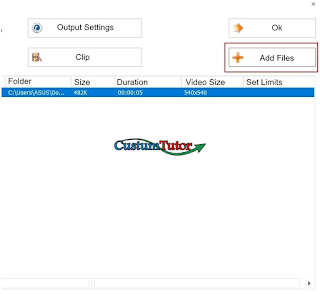
2. After that a new dialog box will appear. Click Add file on the right. Look at the image below. Select a video file with the .mp4 format you want to convert to .mov

How to Convert Video Files Using Format Factory Applications

3. After the file is successfully inserted, click the Start button. Wait until the process is complete to 100%. Then, you can enjoy the file in the folder that you specified earlier.

How to Convert Video Files Using Format Factory Applications

Features and Uses of Format Factory


1. Supports conversion of many Popular Formats, As a converter software with rich multimedia format support, Format Factory offers quite a number of media formats that it supports in the conversion process, both proprietary formats such as MP3 and MP4, as well as non-proprietary formats such as GIF. Media support at Format Factory is not only limited to video, but also audio and images. That way, you don't need to provide multiple converter tools for the conversion of different media types.

2. Supports Cross-Convertion Type, With Format Factory, you can easily convert Video to Audio file formats directly, via the menu. Although it supports cross-conversion types, Format Factory keeps the output media format good, without reducing its quality.

3. Repair Media files, Repair media files is similar to the recovery feature on a system recovery system, the difference is recover optimally works on a certain format. Now in Format Factory, there is a media repair feature for video and audio type files, so that it allows us to repair files damaged by corruption or the like.

4. Compress Media, Like compressing archive formats, Format Factory also supports compression features for the media it supports. This is very good, considering that the multimedia format is a good format for the compression process.

5. Supports preset formats, Besides supporting the conversion process of many formats, Format Factory also supports preset features, to set various output format parameters, and there are also stored settings for commonly used output format configurations such as iPods, Smartphones, and many more.

6. Support image formatting, Apart from supporting the conversion process, Format Factory also supports image formatting processes such as cropping, resizing, saturation and many more.

That's how to use the Windows factory format to convert the file format. This software is certainly very useful for changing certain file formats. So, please try to prove it yourself. Thank you and good luck.
How to Remove Search Protect from Laptop and Computers

How to Remove Search Protect from Laptop and Computers

Have you ever experienced when your browser was infected with Search Protect? Search Protect is a program created by ConduitLTD. This program is also a dangerous browser hijacker, therefore, you should be careful because search protect can steal your personal data. This search protect will be installed automatically on the user's computer when the user installs a freeware application, and is usually unnoticed by the user. If a browser has been infected with Search Protect, then when we open the browser a new, unknown search page will appear.

How to Remove Search Protect from Laptop and Computers

In the browser view, it is filled with annoying advertisements, they all come from the Search Protect application made by Conduit. Search Protect has also dominated almost all browsers such as, Mozilla Firefox, Google Chrome, and Internet Explorer, and so on. Search Protect will also cause your computer to slow down, this is because the program is running behind the scenes and accessing certain servers. Especially if the user is opening the browser and Search Protect will display ads that are very burdensome for the browser.

How to Remove Search Protect from Laptop and Computers


The ads that appear will redirect to dangerous sites or sites such as malware. If the user is not aware of the ad and instead makes him visit a malware site, it is likely that the user's computer will be infected with a virus that can harm the computer.


For how to get rid of it, you can immediately follow some of the methods which I will review below.

A. Remove Search Protect with Task Manager Settings


For the first way you can do to remove Search Protect from your computer, namely by using the Task Manager, for how, just look at the following directly.

Remove Search Protect with Task Manager Settings
  • First you have to open the Task Manager. You can open it by right clicking on Start in the lower left corner.
  • After that you have to click on Processes.
  • Next, on the process tab you have to click the Description column to be able to sort the running applications according to their description. Then you have to scroll down to be able to find Search Protect by Conduit.
  • Then you have to stop the process by clicking End Process on all processes that have a description of Search Protect bt Coundit.
  • Then you can open Explorer and go to the C:\Program Files\directory. Then you have to delete the directory or folder called Search Protect.
  • Then you have to open the Registry Editor by right clicking on Start in the lower left corner, then selecting
  • Then you type regedit in the Run column and click OK.
  • Next you select HKEY_LOCAL_MACHINE then go to SOFTWARE > Microsoft > Windows > CurrentVersion > Uninstall.
  • Finally you will find Search Protect. Right click on Search Protect then you select the delete menu.

B. Remove Search Protect using the Control Panel

 
The second way you can do to remove search protect from your computer is by using the Control Panel, for how, just look at the following directly.

Remove Search Protect using the Control Panel
  • You have to open the Control Panel page by searching for Control Panel on the Search button.
  • Then you have to select the Program / Uninstall a Program menu.
  • Then on the Program / Uninstall a program menu you have to look for an application called Search Protect by Conduit. Now at this step you can also uninstall other suspicious applications.

If we have deleted the Search Protect application, then the next step is that you can remove it from your browser. the way is, as below:

1. Remove Search Protect on Google Chrome


Google Chrome is a browser that we often use to download, stream movies, or just want to surf the internet. However, if our computer has been infected with Search Protect, then we have to uninstall the Search Protect application and we also have to delete it from our browser.

Remove Search Protect on Google Chrome
  • First you have to click the dot icon in the upper right corner of the main page of your browser.
  • Then after that you have to look for the Settings menu and click on the menu.
  • After that you have to click Show Advanced Settings.
  • And then you have to continue by clicking Reset Browser.
  • After that you have to click the Reset button on the display that appears on your monitor screen.

2. Remove Search Protect in Internet Explorer


Another browser that frequently appears Search Protect is Internet Explorer. Therefore, we have to delete it from this browser to keep our computers safe.

Remove Search Protect in Internet Explorer
  • You have to click the icon with the image Settings in the upper right corner of the browser page.
  • Then after that you have to select the Internet Options menu.
  • After that you can click the Advanced tab.
  • Then you can continue by clicking the Reset menu.
  • Now, in the Reset Internet Explorer Settings menu, you can click Delete personal settings.
  • Then you can click reset.
  • Now finally you have to click the Close button and then re-open your Internet Explorer browser to ensure that Search Protect has been cleaned successfully.

3. Remove Search Protect on Mozilla Firefox


The last browser that might be infected with Search Protect is Mozilla Firefox. Therefore, you also have to remove Search Protect from this browser.

Remove Search Protect on Mozilla Firefox
  • First you can click on the Firefox menu in the right corner of the browser from the Help menu. And you can also choose Troubleshooting Information.
  • On that menu you can click the Reset menu in the upper right corner of the Troubleshooting Information page.
  • Then you can click Reset Firefox.
  • Finally, you have to click the Close button and then re-open your Mozilla Firefox browser to ensure that Search Protect has been cleaned successfully.

Those are the tips that I can share this time about How to Remove Search Protect from Laptops and Computers. Hopefully the tips that I have discussed can be useful. Happy reading and good luck. Thank you.

Wednesday, October 21, 2020

How to Set Up ODBC on Windows 10 ( 32/64 Bit )

How to Set Up ODBC on Windows 10 ( 32/64 Bit )

ODBC or Open Database Connectivity is a standard application programming interface (API) for accessing database management systems (DBMS) or also known as database management systems. The designer or developer who makes ODBC has a goal to make ODBC free from the use of certain programming languages, certain database management systems, and certain operating systems. Applications written using ODBC can be ported to other platforms, either on the client or server side, with minor changes to the data access code.  

How to Set Up ODBC on Windows 10 ( 32/64 Bit )

ODBC accomplishes DBMS independence by using the ODBC driver as a translation layer between the application and the DBMS. The ODBC driver is a software standard that enables various applications to share data. There are ODBC drivers for Microsoft® SQL Server ™, Microsoft Access, Oracle®, and so on.

How to set ODBC on Windows 10


The ODBC driver allows you to specify information for connecting to a database in SQL Server, including the directory source name (DSN), directory, database driver, and user ID and password. Then, how do you set up or configure ODBC with SQL Server or something else?

Here are some steps to easily set up ODBC in Windows 10. Immediately, please refer to the steps for setting ODBC in Windows 10 below.

1. The first step, please open the ODBC Data Source on your PC or laptop. how do? You can open it via Windows Explorer C:\Windows\sysWOW64\. Or you can also search via search by typing ODBC. As shown in the image below.

How to Set Up ODBC on Windows 10

2. Then, the ODBC Data Source Administrator window will appear. In this window, please click the DNS System menu tab at the top. As shown in the image below.

How to Set Up ODBC on Windows 10

3. Then, please click Add. As shown below.

How to Set Up ODBC on Windows 10

4. Then, a new window will appear, namely Create New Data Source. Please select SQL Server and click Finish. As shown in the image below.

How to Set Up ODBC on Windows 10
 
5. Then, please enter a Name and Description for the ODBC Data Source that you want to create. Then, please also choose the name of the SQL server you want to connect to. If so, please click Next. As shown in the image below.

How to Set Up ODBC on Windows 10

6. Then, a new window will appear, namely Create a New Data Source to SQL Server. In this window, please select the authentication method required to connect to your SQL Server. There are two options, the first option is Windows NT authentication using a network login ID. This option is only available for Windows networks, and logged in users must have a SQL security login added for their Windows login.

The second option of SQL Server authentication uses the login ID and password entered by the user. You can also select Connect to SQL Server to obtain default settings for the additional configuration options by entering the Login ID and Password for SQL Server. When finished selecting, please click Next. As shown in the image below.

How to Set Up ODBC on Windows 10

7. Then, please check Change the default database to, then select your database name. Then, click Next. As shown in the image below. You don't need to change any other settings in this window.

How to Set Up ODBC on Windows 10

8. Next, please click Finish. As shown below. In this window, you also don't need to make any changes.

How to Set Up ODBC on Windows 10

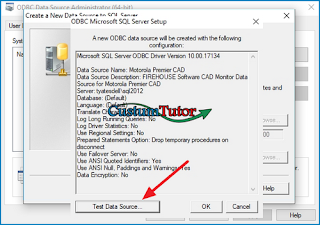
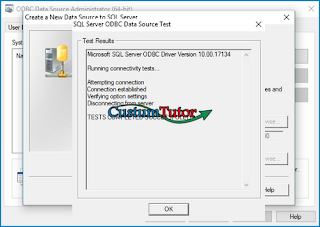
9. Then, if the ODBC Data Source is successfully created, a dialog box will appear as shown below. Then, you can also directly test the Data Source by clicking Test Data Source.

How to Set Up ODBC on Windows 10

10. Then a dialog box will appear containing Tests Complete Successfully! As shown below. And please click OK.

How to Set Up ODBC on Windows 10
 
So many articles this time that discusses how to set up ODBC on Windows 10 very easily. Hopefully this article can be helpful and useful for you. That's all and good luck.